The lever-type consolidation instrument and the air-pressure consolidation instrument are the two most commonly used consolidation test equipment in our country at present. We all understand the disadvantages of the lever-type consolidation instrument, while the disadvantage of the air-pressure consolidation instrument is the test of dozens of consolidation instruments. The pressure sequence must be the same. After all the samples are compressed and stabilized, the lower load can be applied or the test can be terminated. The test cycle is relatively long, which affects the utilization of the equipment and cannot be controlled separately for each channel. In addition, because of the frictional force, the pre-pressure of 1KPa is actually controlled. No matter, even the 12.5KPa gear force cannot be controlled within the accuracy range of 1%, which is estimated by software. In addition, this type of system must be equipped with auxiliary equipment such as air pumps, air pressure stabilizing filter devices, air pressure networks, etc., and must be installed and debugged by professional and technical personnel on site before being put into use; the installation test operation requirements are high, and if the operation is improper, it will be directly Affect the accuracy of test results.
In summary, for the shortcomings of the pneumatic consolidation instrument system, we have developed the third-generation automatic consolidation instrument to completely improve the above shortcomings.
The device can directly collect data.
(1) The lowest test pressure that can be set: 1kPa
(2) Low-pressure consolidation instrument: 1~800kPa
(3) The pressure module can be added to expand to 1600kPa during use
(4) Medium pressure consolidation instrument: 1~1600kPa
(5) The pressure module can be added to expand to 3200kPa during use
(6) High pressure consolidation instrument: 5~3200kPa
(7) Minimum pressure of rebound test: 0kPa
0~300N (100kPa) accuracy≤3N
Low-pressure consolidation instrument: 2400N accuracy≤1%F·S
Medium pressure consolidation instrument: 4800N accuracy≤1%F·S
High-pressure consolidation instrument: 9600N accuracy≤1%F·S
Range: 0~5000N Accuracy: 1%F·S (low and medium pressure consolidation instrument)
Range: 0~10000N Accuracy: 1%F·S (high pressure consolidation instrument)
Accuracy: 0.2%F·S
It is connected to a computer by means of a network port, dozens of consolidation instruments can be connected to the same network. On-site installation is very simple. The microcomputer provides single control and dozens of group control operations, which is very simple.
The controller of the consolidation instrument can operate independently, that is, no computer support is required after the test starts. Automatically protect the test site and collected data when the power is interrupted during the test, and automatically restore the test site to continue the test after the power is restored.
5.1 controller
5.1.1 The main interface of the controller is as follows:
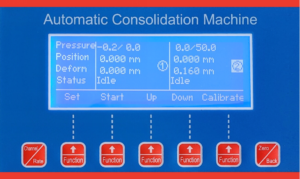
The controller has 7 buttons.
Button 1 is the channel/rate switching button, which realizes the two functions of switching between channel 1 and channel 2 and the switching of the rising and falling rate during the calibration process. When the channel is switched, it will prompt the currently operating channel through digital reverse display. Each consolidator has 2 channels, with channel 1 on the left and channel 2 on the right.
Button 7 is the zero/back function multiplex button. Press the reset button on the main interface to reset the pressure value, which is valid for 2 channels at the same time. In other interfaces, press the back button to exit to the previous interface.
Buttons 2, 3, 4, 5, 6 pairs of multi-function buttons, the button functions according to the current interface display operation.
5.1.2 The main interface setting button sets test-related information, the interface is as shown in the figure below:
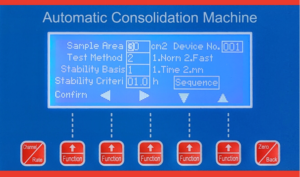
The sample area can be selected from 30cm2and 50cm2, which can be set according to the actual soil sample.
The device number is the physical device number of the current connection, and the device number under the multi-connection consolidation instrument network must be unique and not repeated. The software assigns different IP addresses through the device number for networking to distinguish different devices.
5.1.3 The test method can choose standard consolidation and rapid consolidation.
The basis for judging the stability can be set to stabilize the consolidation according to time and the stability according to displacement to jump to the next level of loading.
When the stability criterion is time, the setting unit of the stability criterion is hour, and the setting range is 0.1-99.9h. When the stability criterion is displacement, the setting unit of the stability criterion is millimeters, and the setting range is 0.01mm-1.00mm.
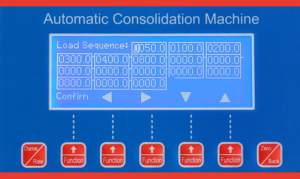
The loading sequence is the loading pressure value of each stage when the sample is gradually loaded. Set up to 16 levels, and set the last level to 0000.0 as the end sign.
The loading sequence setting diagram is shown in the figure below:
After the setting is completed, press the start button on the main interface to indicate the start of the sample.
The main interface up and down buttons are used to manually adjust the current position. Before the test, the current position needs to be adjusted to the bottom as far as possible to avoid the test failure due to insufficient rising and compression stroke during the test. After each test, it will automatically drop to the lower limit.
The calibration interface is used to calibrate the pressure value of each channel at the factory. It has been calibrated at the factory. The user is strictly forbidden to manipulate the force code value randomly and make the instrument unusable.
Each bonding instrument is connected to the switch and computer through a network cable to ensure that the IP address of the computer and the host IP address of the instrument are in the same network segment. Please be careful when plugging and unplugging the network cable, and it is strictly forbidden to pull or unplug the network port of the consolidation instrument at will.
5.2 software
5.2.1. Main interface
New project: When using the system for the first time or testing a new project soil sample, please create a new project first; enter the project name, select the directory where the data is stored, and click Save
Device list: The list on the left side of the main interface, “Search Device” in the device list, will list all the normally operating controllers on the same network segment as the computer, and display their current status. Click on the title bar of “Device Number” on the list, the list will be sorted in the order of device number from smallest to largest, click on the device in the device list, the parameters and data of the corresponding device will be displayed on the right, and the corresponding device can be Control and other operations. The devices in the data list must be operated one by one.
5.2.2. Data collection
Read parameters: read the parameters on the controller.
Setting parameters: After changing the parameters, you must click “Set parameters” to send the parameters to the controller, so that the parameters can be applied.
Pressure reset: Before starting the test, when the pressure does not return to zero, click on the pressure reset to make it return to zero.
Next level: Skip to the next level of pressure in the loading sequence for pressure control.
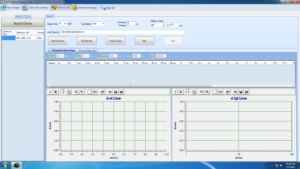
Data and curve: A controller has two channels, that is, two soil samples can be measured at the same time; the parameters of the two channels are shared, and the judgment of stability and control are separate. You can click channel 1 data_curve, channel 2_data curve to switch to view the data and curves of the two channels.
5.2.3. Data processing
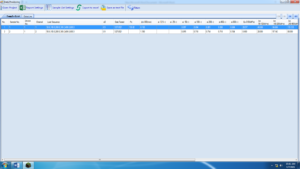
Soil sample list: List all the tested or sampled soil sample information under the current project file. The soil sample parameters need to be filled in, and the test parameters are set during data collection. When you need to view other project data, you can click “Open Project” in the menu bar, find the project file you want to view, and click Open; right-click the soil sample list to delete the soil sample data, but the soil sample data cannot be deleted. Recover, please proceed with caution.
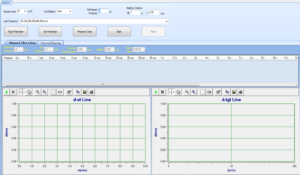
Data-curve: After filling in the soil sample parameters in the soil sample list, double-click the row of the soil sample to be viewed, the system will automatically switch to the data-curve display page after calculating the data, as shown below:
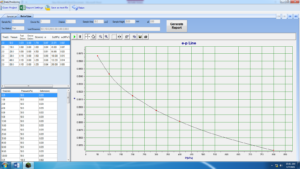
Curve type switching: right-click the curve to switch and display the curve type.
Generate report: Click the “Generate Report” button above the curve, select the template of the required format from the pop-up template list, the system will export the data to the template for display, and the user can save the report template and print it.
Report settings: When the templates in the template list do not meet the needs of users, click the report settings in the menu bar to create the required report templates.
Data adjustment: click on the selected curve, press the F2 key on the keyboard to enter the data adjustment state, a “+” appears on the first point in the curve, press the up and down direction keys to adjust the size of the corresponding data; press the left , Right arrow key can switch data points for adjustment; after adjustment, press F12 to exit the adjustment, the system will prompt whether to save, click and exit the adjustment mode; when the data result curve (ep, e-logp curve) is adjusted, save After that, the system will adjust the corresponding original data according to the adjusted results to achieve the effect of data consistency. When the results are adjusted, the original data curve (d-√t, d-logt) will also change; such as after adjustment The original data curve does not meet the requirements, and the original data can be adjusted again.